Okay, more projects for me to do. I need to get all my supplies. We're putting up our tree tomorrow. I know, I'm late!
Ribbons and Bows

Petal Bow-Ornament
The petal bow is similar to the medallion bow. For the petal bow, make 2 1/4-inch accordion folds in ribbon (ours is 5/8 inch wide and 45 inches long); end with the raw edges facing down. Pass needle and thread through bottom, about 1/4 inch from edge. Hold together, and pull taut; knot. Spread petals; tie silver twine around thread to hang.
Figure-Eight Ornament
This is made with 15-inch-long, 3/8-inch-wide satin ribbon. Follow instructions on page 102 to make three figure-eight bows, but start with the cut edge at back of bow instead of at front, and make two layers instead of three. Cross and glue two of the bows. Glue a loop of silver twine at the front center. Glue a third bow across the middle, as shown, concealing twine.

Card Holder
This project uses a tuxedo bow.
Tools and Materials
scissors
4-inch-wide ribbon card envelopes
9-mm-wide ribbon fabric glue (such as Magna-Tac 809)
20-gauge wire self-adhesive hook, for hanging
Card Holder How-To
1. Make tail: Cut a 40-inch (or longer) length of wide ribbon. To make an even notch in the bottom, fold ribbon in half lengthwise and cut on an angle from outer edge to fold; unfold. Since you’ll likely be making this before holiday cards arrive, lay out five or six card envelopes along front of ribbon, some horizontally and others vertically, keeping 1/2 inch between them. Lay a narrow ribbon down each side (about 1/2 inch in from edge); trim ends to match angle of notch. With envelopes as your guide, glue narrow ribbons to the wide ribbon between envelopes. Slide envelopes out.

2. With a 25-inch-long wide ribbon, make a 12-inch tuxedo bow; wrap center tightly to cinch bow. At back, knot narrow ribbon around center band, then rotate narrow ribbon so its knot is concealed inside. This will be the loop from which bow will hang.

3. Cinch top of tail: Twist a piece of wire into a loop. Fold top corners under about 1 inch (top edges should be flush); at the same time, press the top center in with your thumbs, forming shape shown. Secure ribbon with dabs of glue, and glue wire to center. Using a removable self-adhesive hook, hang tail first, and then bow.

Picture Frame Ornaments

Ornaments with photos of your friends and family are a great way to decorate your Christmas tree.
Tools and MaterialsPhotographs
Ornament templates (
template 1,
template 2,
template 3,
template 4,
template 5)
Heavy-duty (80-pound) card stock
Pencil
Scissors or utility knife
Hole punch
White glue
Glitter
Wax paper
Dresden embellishment
Picture-Frame Ornaments How-To1. Download and print ornament templates (
template 1,
template 2,
template 3,
template 4,
template 5).
2. Trace template shapes onto heavy-duty card stock.
3. Cut out two identical shapes.
4. Punch both ornament shapes at top.
5. Apply diluted white glue solution (2 parts glue to 1 part water) to surfaces of both shapes.
6. Apply glitter to glue.
7. Set aside to dry; cover with a sheet of wax paper and weigh down with a heavy book to keep from curling.
8. Using a utility knife, cut an X into the center of the ornament.
9. Use a pencil to curl back points, creating a square opening.
10. Glue photo to unglittered side of flat shape.
11. Glue both halves together, sandwiching photo.
12. Thread ribbon through hole and glue on Dresden embellishment.
Click and Print Ornaments
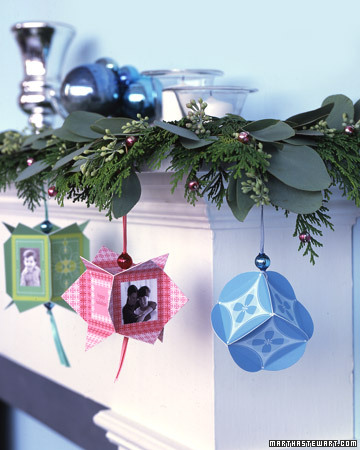
At least one kind of mouse will be stirring this Christmas: Download our ornament templates, and then add your pictures to fashion personalized decorations.
Ornament How-To
Download templates; print onto card stock (or color-photocopy at 130 percent). Using a utility knife, cut out the six squares. (If adding photos, use imaging software to size them to fit windows, which are 1 1/4 inches square. Print onto photo paper; cut out, leaving a 1/8-inch border. Cut out windows on two squares; tape photos to back.)
1. With printed sides faceup, score the four corners of each square with a bone folder. Fold corners up at 90-degree angles. Using a glue stick, attach squares to form ornament.
2. Trim edges with scissors if making rounded-edge cube. Thread a long needle with ribbon; pull through a corner, adding a bead and knotting. Or pull a double strand of ribbon through top and bottom; add two beads and knot.
Digital Photo How-To
If you're savvy with presentation software, use it to import digital images directly into the template: Open a new document in the program; insert template. Insert two photos in document. Drag photos to marked boxes; resize photos. Print document onto photo-quality card stock (matte finish). Proceed with ornament how-to instructions.
Walnut Ornament
This distinctive ornament will make a festive decoration in your home.
Tools and Materials3 3/4-inch screw eye
8-inch Styrofoam ball
Small pail
Gold floral spray
Walnuts
Low-melt glue gun
Cardboard box
Ribbon
Greenery, such as eucalyptus
Walnut Ornament How-To1. To assemble, insert a 3 3/4-inch screw eye into an 8-inch Styrofoam ball. Set in a small pail to keep it from rolling.
2. Coat with gold floral spray.
3. Affix walnuts using a low-melt glue gun.
4. Coat the nuts twice with floral spray. Spray inside a box to avoid paint damaging your table.
5. Add ribbon.
6. Add greenery.
7. Hang from screw eye.
Button Wreath Ornament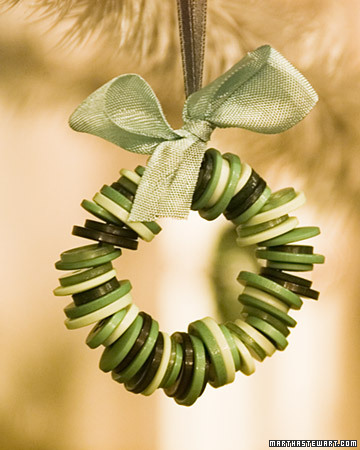
Colorful stray buttons can be put to new use as Christmas ornaments. If you don't have enough loose buttons, or the right colors, don’t worry -- stores sell them by the bagful. Kids will enjoy this project because each wreath they make will be unique.
Tools and Materials
Needle-nose pliers or wire cutters
16-gauge copper wire, or 22-gauge green floral wire, cut to 9-inch lengths
72 buttons for each wreath
Scissors
Satin ribbon, 1/8 inch wide and 6 inches long
Seam binding for decorative bow
Button Wreath Ornament How-To
1. Using pliers, make a small loop at one end of the wire.
2. Thread buttons onto the wire until you have enough to form the size of the wreath you want. Our wreaths are 2 1/2 inches in diameter.
3. Using pliers, bend the plain end of the wire around the looped end. This will form the wreath.
4. Use the satin ribbon to make a loop for hanging the wreath; tie the ribbon in a knot about 3 inches above the wreath.
5. Tie a bow of seam binding to decorate the wreath.
Sources
16-gauge copper wire
22-gauge silver-plate wire
Available at local craft and hardware-supply stores
22-gauge green floral wire
Available at local floral-supply stores
Seed Packet Ornaments
We turned vintage seed packets into templates you can download; print on card stock, and cut out with scissors. You'll need two per ornament.
Tools and Materials
White card stock
Scissors
Small paintbrush
Craft glue
Plastic spoon
Clear glass glitter
Glitter powder in various colors
Raffia fringe
Twine
Seed Packet Ornaments How-To
1. Brush template borders with glue, spoon on glass glitter, and pour off excess; accent vegetables with glitter powder the same way. Let dry.

2. Glue fringe to back; glue ends of a length of twine to back edges. Glue the other template back-to-back with first; let dry. Flatten inside a heavy book overnight.

Felt Animal Ornaments

Colorful ornaments stand out against the dense branches of a Nordmann fir. A vintage fence and a mound of fake snow provide the base.
Felt Animal Ornaments How-To
1. Print templates. (You can reduce or enlarge the templates to fit your tree. We enlarged the templates at 200 percent and 225 percent.) Cut out two versions of each template, one following the outline and the other omitting the black details (use fine-tip scissors for the interior cutouts).
2. On top of light-colored felt, such as cream or eggshell, pin the outline template, and trace it with a disappearing-ink pen. Remove template, and cut out. On a colored piece of felt, pin and trace the detailed template twice. Cut out: Use fine-tip scissors for interior cutouts and a Japanese hole punch to create the eyes and the hole for hanging.
3. Lightly brush craft glue onto the back sides of colored-felt pieces; sandwich the light-colored piece in between. Let dry flat.
4. Hang from a length of silver thread, knotting at top.
Floating Ornaments
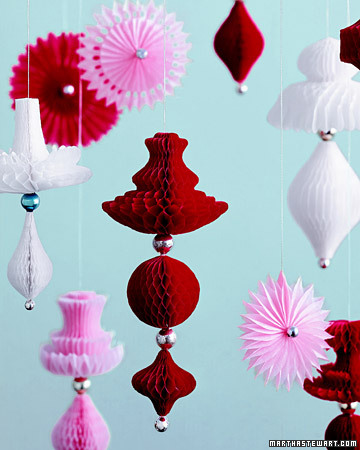
Nearly weightless ornaments seem to hover rather than hang. The honeycomb paper, cut into curvy forms, opens into translucent layers. Vintage metallic beads are used as accents. Trace shapes onto the paper, and unfold them for the three-dimensional effect -- the ornaments are as easy to make as paper snowflakes.
1. Trace templates (download them here) onto honeycomb paper; position paper so that its lines are perpendicular to dotted lines on templates. Place double-sided tape on 1 side of cutouts. Unfold to make shapes; pinch taped seams closed with tweezers.

2. Use a pin to dab clear fabric glue onto center; press inward to bind. Lay flat; gently weight with a juice glass. Let dry 30 minutes. Slide a metallic bead onto middle of an 8-inch length of 32-gauge tinned copper wire. Twist at bead. Use a pin to make a hole in glued center; pull both ends of wire through until bead is flush with center. On reverse side, thread 1 end of wire through 1 hole of a second bead; thread other end of wire through bead's opposite hole. Twist ends to secure; trim excess. Gently open taped seam; sandwich an 8-inch-long silver cord in seam to form a loop.

3. String a small metallic bead onto middle of a 20-inch-long silver cord; knot to secure. Use a tapestry needle to thread ends of cord up through bottom pendant; secure taped seam with clear fabric glue. String a large bead onto both ends of cord. Thread cord up through top pendant; glue seam. Knot cord to form loop.


 of the Lord appeared to them, and the glory of the Lord shone around them, and they were terrified.


.jpeg)