Cinnamon Bird Ornaments
Although these whimsical birds look and smell like gingerbread cookies, their sparkling plumage hints at their true nature as sweet works of art. This sturdy flock -- including a cardinal and chickadee, among other birds -- will migrate each Christmas to decorate the tree. The birds are not meant to be eaten, though, however enticing they may be.

Tools and Materials
2 medium bowls
1 cup ground cinnamon
1/4 cup applesauce
Craft glue
Rolling pin
Bird templates
Utility knife, or bird-shaped cookie cutters
One straw
Wire rack
Paper towels
Baking sheet
Glitter and beads
Bottle with applicator tip
Length of thin ribbon for each ornament
Tissue paper, for storing

Prepare Dough
Step 1
In a medium bowl, mix together 1 cup ground cinnamon and 1/4 cup applesauce using a rubber spatula.

Step 2
Stir in 1/2 cup craft glue. Stir the dough until consistency is smooth and dry. Let stand 1 hour. Applesauce gives the dough pliability, glue makes it firm, and cinnamon imparts a lovely fragrance and a gingerbread color.

Step 3
Turn out one-quarter of dough onto a cool, flat surface; flatten with your hands.

Step 4
Flatten with a rolling pin to 1/4 inch thick. If dough becomes too dry, spritz with water. If it sticks to rolling pin or work surface, sprinkle with additional cinnamon.
 Cut out Shapes
Step 5
Photocopy bird templates onto card stock (these are enlarged roughly 150 percent); cut them out, punching holes where indicated. Lay a template over dough; cut out shape with a utility knife (or use bird-shaped cookie cutters). Repeat with each of three remaining quarters of dough.
 Dry Ornaments
Step 6
With a straw, poke a hole in dough as indicated on template (for hanging). Air-dry ornaments on a wire rack lined with paper towels for 24 hours, turning them over every 6 hours or so to keep them flat. Alternatively, preheat oven to 200 degrees. Transfer ornaments to a baking sheet; bake, flipping once, until dry, about 2 hours. Once the dough has dried completely, adorn the birds with markings inspired by nature or your imagination. As you decorate, proceed from the finest embellishment to the coarsest, adding glitter, then beads in order of size.

Decorate Ornaments
Step 7
Using a bottle with an applicator tip, spread craft glue over the area you wish to decorate.

Step 8
While glue is still wet, sprinkle with glitter or beads, holding ornament over a bowl as you work; tap off excess.

Step 9
Wait for the first area to dry completely (at least 30 minutes) before repeating steps 7 and 8 on another section. Thread a length of ribbon through ornament's hole, trim the ends to prevent fraying, and knot. Once you take the ornaments off the tree, store them, wrapped individually in tissue paper, in a cool, dry place.
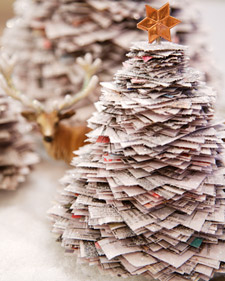
Shimmering Stacked Tree
This shimmering stacked tree will add a festive -- and eco-friendly -- touch to your home this holiday season. These magnificent trees can also be stacked using any leftover aluminum foil, felt, or crepe paper.
Tools and Materials
4 ounces Sculpey clay
10-inch, 6mm thick knitting needle
Felt
Craft glue
Clear glass glitter
Receipt spike (optional)
2 pieces 6-by-6-inch card stock
Newspaper
Utility knife
Bone folder
Adhesive spray
Hot-glue gun and glue
2 paper Dresden stars
Stacked Tree How-To
1. Roll and flatten 4 ounces sculpting clay to form dome shape. Poke knitting needle horizontally through flat area of clay dome. Remove knitting needle.
2. Bake clay in oven at 275 degrees for 15 to 20 minutes. Reinsert needle into baked clay. Glue felt on bottom of base for surface protection.
3. Apply glue, then glitter, to the base. A receipt spike can be used to create a smaller tree instead of building a base using the above instructions.
4. To form tree, place 2 pieces of 6-by-6-inch card stock onto spike for stability.
5. Cut newspaper into 50 sheets of each size:
-6 by 6 inches
-5 1/2 by 5 1/2 inches
-5 by 5 inches
-4 1/2 by 4 1/2 inches
-4 by 4 inches
-3 1/2 by 3 1/2 inches
-3 by 3 inches
-2 1/2 by 2 1/2 inches
-2 by 2 inches
-1 1/2 by 1/2 inch
6. Cut 25 1-inch sheets of newspaper.
7. Begin poking pieces of newspaper onto spike in descending order, folding and unfolding each piece of paper using a bone folder.
8. Spray tree with adhesive and immediately sprinkle with diamond dust. Set aside and let dry for 10 minutes.
9. Using a hot-glue gun, adhere 2 paper Dresden stars back-to-back to top of tree.
Pinecone Hurricane Vase
Flowers and paper leaves accessorize hurricanes. After making the blossom, affix to decorative ribbon and wrap around hurricane vases.

Blossom How-To
Fill a small bowl with scales. For the work surface, you'll need a cardboard box (at least 4 inches square) with a hinged lid. Snip 4 inches of floral wire; form a small hook on one end. From card stock, cut a disk a bit larger than the desired size of the bloom's center. Secure disk to box top by poking wire through both, letting hook rest in the center so the wire won't fall through. Using tacky glue, affix scales in a flower shape to disk; the hook will become covered with glue. For a fuller blossom, add another layer inside the first, using smaller scales, adding up to five layers for larger blooms. Use tacky glue to attach one or more cloves or tiny plant parts in the center; let dry, and remove bloom from box.
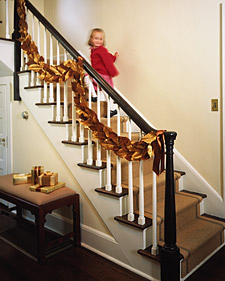
Magnolia Garland
Tools and Materials
Medium-weight cardboard stock
Approximately 40 dried magnolia leaves for each section of the garland
22-gauge floral wire
Small paintbrush
Water-based glue
Gold mica
Gilding brush
Satin ribbon
Magnolia Garland How-To
1. To create the cardboard base for the leaves, photocopy the template below, increasing the size by 200 percent. Cut out each piece along dotted line and enlarge by 200 percent; repeat.
2. For each garland section, trace the shapes on cardboard stock. Cut out pieces, and punch a small hole at either end with a nail. Link pieces with double rings of floral wire to form the curved shape.
3. With brush, apply glue to top of each leaf, then dust on gold mica with the gilding brush. (Always wear a dust mask when working with mica powder.) Shake off excess and let dry completely.
4. Affix leaves to cardboard with hot glue in an overlapping pattern, alternating one mica side up, one unpainted side up. Attach to staircase using satin ribbon tied in a simple knot.
Beaded Ornaments: Letters and Stars

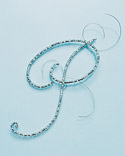
A large, sparkling monogram is a great way to personalize a present. Tied here with ribbons, the letters are easily transformed into ornaments.
Tools and Materials
Letters template (omit leaves and berries in letters if desired)
20-gauge wire (18 inches per ornament)
Seed beads
Round-nosed pliars
Beaded Letters How-To
1. Choose a letter template or use another font. Enlarge or reduce template to desired size on a photocopier.
2. Cut 20-gauge wire to size; 18 inches is generally a good starting length. Make a loop at one end with round-nosed pliers. Transfer seed beads to wire, leaving 3 inches of wire unbeaded (to allow for sharp turns in the shape), and loop the wire at the other end.
3. Following template, shape the beaded wire. Cut off excess wire at one end, leaving about 1/2 to 3/4 inch exposed wire, and loop it with pliers. For two-piece letters, attach pieces with 30-gauge wire, as shown. Shape 20-gauge wire into a hook.
Beaded Star Ornaments
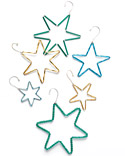
A Christmas tree covered with a few dozen beaded stars will sparkle like the night sky. Vary the size, color, and shape of the beads -- as well as the sizes of the stars themselves -- to add visual interest.
Tools and Materials
Star template
20-gauge wire (18 inches per ornament)
Seed beads
Round-nosed pliars
Beaded Star Ornaments How-To
1. Choose any star template of your liking. Enlarge or reduce template to desired size on a photocopier.
2. Cut 20-gauge wire to size; 18 inches is generally a good starting length. Make a loop at one end with round-nosed pliers. Transfer seed beads to wire, leaving 3 inches of wire unbeaded (to allow for sharp turns in the shape), and loop the wire at the other end.
3. Following template, shape the beaded wire. Cut off excess wire at one end, leaving about 1/2 to 3/4 inch exposed wire, and loop it with pliers. Shape 20-gauge wire into a hook.
Mini Stockings
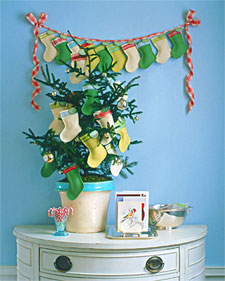
These stockings are just large enough to hold a small gift or sweet for each of the 24 days of Advent. If your tree is too small to hold 24 stockings, hang the rest from a ribbon swag.
Use a computer to print numbers, then cut them out and glue them to metal-rimmed tags; or label the tags by hand. Use felt in various colors, and add ribbons in complementary hues.
If you like, hang a swag of stockings without tags across the mantel, tie them onto gifts, or hang them from the tree.
Tools and Materials
Felt
Ribbon
Marking pencil or tailor's chalk
Sewing scissors
Pinking shears
Sewing machine
Straight pins
Awl
Metal-rimmed tags
Mini Stockings How-To
1. For each stocking, trace the template onto felt twice with a pencil or tailor's chalk, and cut out. Pin the two pieces of felt together at the toe, heel, and instep.

2. Cut a piece of ribbon just longer than the width of the stocking's opening; position it about 1/4 inch from the top, and pin in place. Sewing 1/2 inch in from the edge, machine-stitch the front, back, and ribbon together, leaving the stocking's top open.

3. Trim around the seam with pinking shears.To hang the stocking, use an awl to punch a hole through both pieces of felt in the upper right corner; thread silver twine or a narrow ribbon through the holes, and tie on a metal-rimmed tag.

Glittered Hurricane Lantern
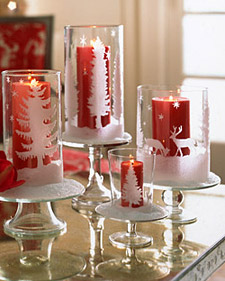
Glittered snow scenes sparkle
on these easy-to-make lanterns
as a flame dances within.
Tools and Materials
Glass hurricane lantern
Transparent tape
Glue pen
Fine clear glass glitter
Cake stand
Tall candle
Lantern How-To
Photocopy Template enlarging to fit into hurricane.
1. Roll up the template and slide it inside the hurricane, with the design facing outward. Tape at top to secure. Using tip of glue pen, outline one section of the design, and fill it in.
2. Sprinkle with glitter. Let glue dry; shake off excess glitter. Glue and glitter the next section of the design. Continue all the way around. Remove template. Place hurricane on stand, and place candle inside.
Paper Evergreen

Step 1
For large Christmas trees, use an adjustable circle cutter to make 2-, 3-, 4-, 5-, and 6-inch-diameter circles from green card stock (for small trees, omit the 6-inch circle).
Step 2
Fold each circle in half 4 times with a bone folder (top). While circles are folded, snip off the tip of each piece, forming a very small hole in center.
Step 3
Place smallest circle on the pointed end of a wooden skewer (we used 12-inch skewers), letting the tip poke through the hole in circle. With a hot-glue gun, dab underside of circle, where paper and skewer meet. Hold for 10 seconds to secure.
Step 4
Working 1 at a time from smallest circle to largest, slide remaining circles onto skewer; secure with glue.
Step 5
Insert bottom of skewer into a spool; remove, and cut skewer to desired height (we cut ours to 6, 9, and 10 inches), keeping in mind that only spool should be visible beneath standing tree. Return skewer to spool; secure with glue. Add a dot of glue to top of skewer, and attach a gold bead.


.jpeg)











5 comments:
Mary Anne, these projects are wonderful. I love the birds and the cute little stockings. I just love Martha period. Thank you for sharing these with us. So glad to see you online! I always smile when I do.
Sending much love to you and yours...
XO,
Sheila :-)
i came over from susie harris'...and you have amazing stuff here! i am in bloggy love with all these ideas...now if i can just add like 10 hours to today i can get a few done!
hi sheila,
just like mommaof4 says, if i can just add 10 hours to my day, i will have these projects done in no time!
OOOOooohhh! I can't wait to read through this more carefully! I LOVE birds and I will most definitely be doing some of those ornaments! I just wanted to leave a quick comment before supper, but I will be back after while! : )
These are all such great ideas! My favorite is thet first--the birds! Sorry I haven't been very good about commenting lately--I've been behind on reading everyone's blogs! I'm trying to catch up!
Post a Comment