Thursday, December 11, 2008

Thanksgiving Weekend in San Francisco

I know it's a little late but I thought I'd post pictures from our Thanksgiving weekend in San Francisco. We had such a wonderful time. It's always good to see family. Also, I finally actually felt and experienced true Fall! It was such a change from our weather in Los Angeles, which was mid-70's today.

While there, we decided to go to the Palace of Fine Arts with all of my brothers and sisters, mom and all of our kids! It was so much fun! This place holds a special place in my heart because this is where Leo brought me after he proposed to me. When we arrived, there was a bride getting her bridal portraits done. I'm sure she's going to have beautiful pictures. The homes surrounding this area are just spectacular--can I say gorgeous! I can only dream of waking up and seeing the Palace of Fine Arts and the Golden Gate Bridge as I eat breakfast!


Here's some pictures of LJ. I can't believe how much my little boy has grown! I catch myself still calling him my baby boy but, oh when I look at him, he has grown so much.

What's new with him? Lately, Leo and I find ourselves reminding him that his baby brother is just that, a baby. He treats Lucas like he's the same age as him. He has attempted multiple times to wrestle with the baby. To our amazement, Lucas just looks at his big brother with a big grin.

LJ is also learning how to be a big brother. This child has about 100 (okay maybe 200) hot wheels among tons of other toys. If his baby brother so much attempts to touch any of his toys, he yells, "MINE"! We've had to lovingly remind him that baby brother is a baby and doesn't really know what he is doing. He needs to be patient with him and be gentle.

The one thing I adore about my Super LJ (what I call him) is his sensitive heart. He has so much compassion for others, especially when they're sad. It's amazing to me how observant my little boy is. There are times when he'll come up to me and say, "Mama, I'm sad". I'll ask him why and he will tell me either he saw a person with a sad face or he sees someone crying. He also "gets sad" when Dad is at work.


What else does LJ like? While he continues to love sticks and rocks, he also developed a love for leaves. This child of mine, will collect leaves, different sizes, shapes, and colors but most important to him, THE BIGGER, THE BETTER! He also is developing a love for animals and insects. One time, I was about to cut open a fruit when I noticed lady bugs tucked inside the leaves. He begged and pleaded for me to give him the lady bugs. I had to open a jar of spaghetti sauce so we can put the lady bugs in the jar and poke holes on the lid. Everyday, he would get a leaf for his friends, the lady bugs, and put it in the jar. Eventually, he allowed the lady bugs to be freed after watching a TV show where insects were flying up in the air. I guess my sensitive boy felt sorry for them.

NOTE: Notice that on these following pictures my big boy is holding sticks and leaves!


What's new with Lucas? Well, the day after Thanksgiving, Lucas' 2 bottom teeth erupted. He kept licking and playing with those things in his mouth the whole weekend. He was sooo curious about them that he learned to blow and play weird noises with his tongue in the process. He is so active. He continues to do the military crawl SO FAST. We call him Speedy Gonzales, Lightning Speed, Speedster. He can sit up on his own. He can get on all 4's and move around but he still ends up doing the military crawl.

He loves to follow his big brother. It doesn't matter if LJ is rough or taking back a toy, he just adores his big brother! Wherever LJ is, Lucas will crawl there. Whatever big brother is working on, Lucas is sure to try to help out by destroying whatever it is big brother is working on.

...........
Oh but how I love watching you two! I am so looking forward to when the two of you are able to really play together. I pray that you will be best friends, that you both will learn to be there for each other and to depend on each other. I pray that you will encourage one another and protect each other's hearts and interests. I pray that you both will develop a love for Jesus so deep that it will be ingrained in your hearts and minds.

NOTE: The following pictures were taken while LJ was trying to put Lucas' socks back on. Lucas kept kicking his socks and shoes off but big brother said, "Mama, brother will get cold. I have to put his socks on".


o


Saturday, December 6, 2008

Christmas Ornaments

Okay, more projects for me to do. I need to get all my supplies. We're putting up our tree tomorrow. I know, I'm late!

Ribbons and Bows


Petal Bow-Ornament
The petal bow is similar to the medallion bow. For the petal bow, make 2 1/4-inch accordion folds in ribbon (ours is 5/8 inch wide and 45 inches long); end with the raw edges facing down. Pass needle and thread through bottom, about 1/4 inch from edge. Hold together, and pull taut; knot. Spread petals; tie silver twine around thread to hang.

Figure-Eight Ornament
This is made with 15-inch-long, 3/8-inch-wide satin ribbon. Follow instructions on page 102 to make three figure-eight bows, but start with the cut edge at back of bow instead of at front, and make two layers instead of three. Cross and glue two of the bows. Glue a loop of silver twine at the front center. Glue a third bow across the middle, as shown, concealing twine.

Card Holder
This project uses a tuxedo bow.

Tools and Materials
scissors
4-inch-wide ribbon card envelopes
9-mm-wide ribbon fabric glue (such as Magna-Tac 809)
20-gauge wire self-adhesive hook, for hanging

Card Holder How-To
1. Make tail: Cut a 40-inch (or longer) length of wide ribbon. To make an even notch in the bottom, fold ribbon in half lengthwise and cut on an angle from outer edge to fold; unfold. Since you’ll likely be making this before holiday cards arrive, lay out five or six card envelopes along front of ribbon, some horizontally and others vertically, keeping 1/2 inch between them. Lay a narrow ribbon down each side (about 1/2 inch in from edge); trim ends to match angle of notch. With envelopes as your guide, glue narrow ribbons to the wide ribbon between envelopes. Slide envelopes out.

2. With a 25-inch-long wide ribbon, make a 12-inch tuxedo bow; wrap center tightly to cinch bow. At back, knot narrow ribbon around center band, then rotate narrow ribbon so its knot is concealed inside. This will be the loop from which bow will hang.

3. Cinch top of tail: Twist a piece of wire into a loop. Fold top corners under about 1 inch (top edges should be flush); at the same time, press the top center in with your thumbs, forming shape shown. Secure ribbon with dabs of glue, and glue wire to center. Using a removable self-adhesive hook, hang tail first, and then bow.


Picture Frame Ornaments

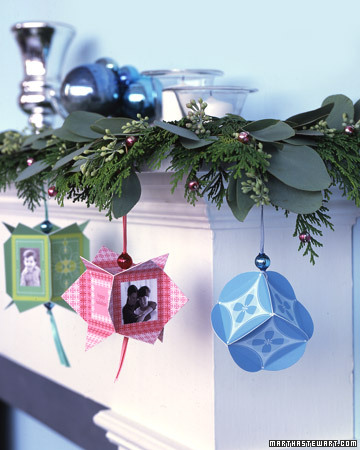
Ornaments with photos of your friends and family are a great way to decorate your Christmas tree.

Tools and Materials
Photographs
Ornament templates (template 1, template 2, template 3, template 4, template 5)
Heavy-duty (80-pound) card stock
Pencil
Scissors or utility knife
Hole punch
White glue
Glitter
Wax paper
Dresden embellishment

Picture-Frame Ornaments How-To
1. Download and print ornament templates (template 1, template 2, template 3, template 4, template 5).

2. Trace template shapes onto heavy-duty card stock.

3. Cut out two identical shapes.

4. Punch both ornament shapes at top.

5. Apply diluted white glue solution (2 parts glue to 1 part water) to surfaces of both shapes.

6. Apply glitter to glue.

7. Set aside to dry; cover with a sheet of wax paper and weigh down with a heavy book to keep from curling.

8. Using a utility knife, cut an X into the center of the ornament.

9. Use a pencil to curl back points, creating a square opening.

10. Glue photo to unglittered side of flat shape.

11. Glue both halves together, sandwiching photo.

12. Thread ribbon through hole and glue on Dresden embellishment.


Click and Print Ornaments


At least one kind of mouse will be stirring this Christmas: Download our ornament templates, and then add your pictures to fashion personalized decorations.

Ornament How-To
Download templates; print onto card stock (or color-photocopy at 130 percent). Using a utility knife, cut out the six squares. (If adding photos, use imaging software to size them to fit windows, which are 1 1/4 inches square. Print onto photo paper; cut out, leaving a 1/8-inch border. Cut out windows on two squares; tape photos to back.)

1. With printed sides faceup, score the four corners of each square with a bone folder. Fold corners up at 90-degree angles. Using a glue stick, attach squares to form ornament.

2. Trim edges with scissors if making rounded-edge cube. Thread a long needle with ribbon; pull through a corner, adding a bead and knotting. Or pull a double strand of ribbon through top and bottom; add two beads and knot.

Digital Photo How-To
If you're savvy with presentation software, use it to import digital images directly into the template: Open a new document in the program; insert template. Insert two photos in document. Drag photos to marked boxes; resize photos. Print document onto photo-quality card stock (matte finish). Proceed with ornament how-to instructions.


Walnut OrnamentThis distinctive ornament will make a festive decoration in your home.

Tools and Materials
3 3/4-inch screw eye
8-inch Styrofoam ball
Small pail
Gold floral spray
Walnuts
Low-melt glue gun
Cardboard box
Ribbon
Greenery, such as eucalyptus

Walnut Ornament How-To
1. To assemble, insert a 3 3/4-inch screw eye into an 8-inch Styrofoam ball. Set in a small pail to keep it from rolling.

2. Coat with gold floral spray.

3. Affix walnuts using a low-melt glue gun.

4. Coat the nuts twice with floral spray. Spray inside a box to avoid paint damaging your table.

5. Add ribbon.

6. Add greenery.

7. Hang from screw eye.

Button Wreath Ornament

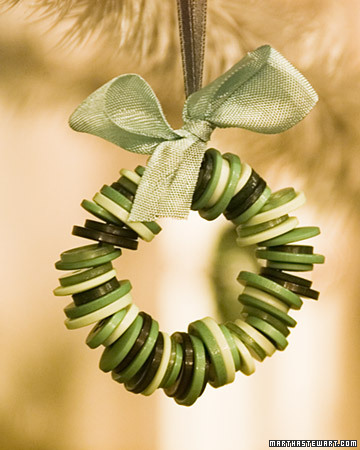
Colorful stray buttons can be put to new use as Christmas ornaments. If you don't have enough loose buttons, or the right colors, don’t worry -- stores sell them by the bagful. Kids will enjoy this project because each wreath they make will be unique.

Tools and Materials
Needle-nose pliers or wire cutters
16-gauge copper wire, or 22-gauge green floral wire, cut to 9-inch lengths
72 buttons for each wreath
Scissors
Satin ribbon, 1/8 inch wide and 6 inches long
Seam binding for decorative bow

Button Wreath Ornament How-To
1. Using pliers, make a small loop at one end of the wire.

2. Thread buttons onto the wire until you have enough to form the size of the wreath you want. Our wreaths are 2 1/2 inches in diameter.

3. Using pliers, bend the plain end of the wire around the looped end. This will form the wreath.

4. Use the satin ribbon to make a loop for hanging the wreath; tie the ribbon in a knot about 3 inches above the wreath.

5. Tie a bow of seam binding to decorate the wreath.

Sources
16-gauge copper wire
22-gauge silver-plate wire
Available at local craft and hardware-supply stores

22-gauge green floral wire
Available at local floral-supply stores


Seed Packet Ornaments

We turned vintage seed packets into templates you can download; print on card stock, and cut out with scissors. You'll need two per ornament.

Tools and Materials
White card stock
Scissors
Small paintbrush
Craft glue
Plastic spoon
Clear glass glitter
Glitter powder in various colors
Raffia fringe
Twine

Seed Packet Ornaments How-To
1. Brush template borders with glue, spoon on glass glitter, and pour off excess; accent vegetables with glitter powder the same way. Let dry.

2. Glue fringe to back; glue ends of a length of twine to back edges. Glue the other template back-to-back with first; let dry. Flatten inside a heavy book overnight.


Felt Animal Ornaments


Colorful ornaments stand out against the dense branches of a Nordmann fir. A vintage fence and a mound of fake snow provide the base.

Felt Animal Ornaments How-To
1. Print templates. (You can reduce or enlarge the templates to fit your tree. We enlarged the templates at 200 percent and 225 percent.) Cut out two versions of each template, one following the outline and the other omitting the black details (use fine-tip scissors for the interior cutouts).

2. On top of light-colored felt, such as cream or eggshell, pin the outline template, and trace it with a disappearing-ink pen. Remove template, and cut out. On a colored piece of felt, pin and trace the detailed template twice. Cut out: Use fine-tip scissors for interior cutouts and a Japanese hole punch to create the eyes and the hole for hanging.

3. Lightly brush craft glue onto the back sides of colored-felt pieces; sandwich the light-colored piece in between. Let dry flat.

4. Hang from a length of silver thread, knotting at top.

Floating Ornaments


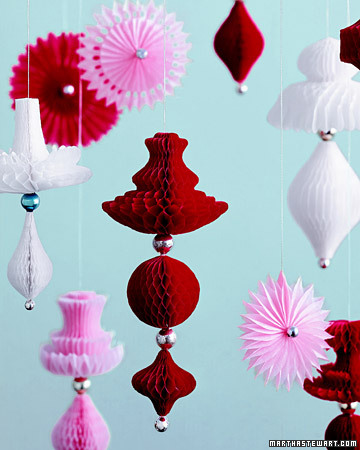
Nearly weightless ornaments seem to hover rather than hang. The honeycomb paper, cut into curvy forms, opens into translucent layers. Vintage metallic beads are used as accents. Trace shapes onto the paper, and unfold them for the three-dimensional effect -- the ornaments are as easy to make as paper snowflakes.

1. Trace templates (download them here) onto honeycomb paper; position paper so that its lines are perpendicular to dotted lines on templates. Place double-sided tape on 1 side of cutouts. Unfold to make shapes; pinch taped seams closed with tweezers.

2. Use a pin to dab clear fabric glue onto center; press inward to bind. Lay flat; gently weight with a juice glass. Let dry 30 minutes. Slide a metallic bead onto middle of an 8-inch length of 32-gauge tinned copper wire. Twist at bead. Use a pin to make a hole in glued center; pull both ends of wire through until bead is flush with center. On reverse side, thread 1 end of wire through 1 hole of a second bead; thread other end of wire through bead's opposite hole. Twist ends to secure; trim excess. Gently open taped seam; sandwich an 8-inch-long silver cord in seam to form a loop.

3. String a small metallic bead onto middle of a 20-inch-long silver cord; knot to secure. Use a tapestry needle to thread ends of cord up through bottom pendant; secure taped seam with clear fabric glue. String a large bead onto both ends of cord. Thread cord up through top pendant; glue seam. Knot cord to form loop.

Thursday, December 4, 2008

Crafts for Christmas

Thanks to Martha Stewart, I have so many projects to do for Christmas!

Cinnamon Bird Ornaments
Although these whimsical birds look and smell like gingerbread cookies, their sparkling plumage hints at their true nature as sweet works of art. This sturdy flock -- including a cardinal and chickadee, among other birds -- will migrate each Christmas to decorate the tree. The birds are not meant to be eaten, though, however enticing they may be.


Tools and Materials

2 medium bowls
1 cup ground cinnamon
1/4 cup applesauce
Craft glue
Rolling pin
Bird templates
Utility knife, or bird-shaped cookie cutters
One straw
Wire rack
Paper towels
Baking sheet
Glitter and beads
Bottle with applicator tip
Length of thin ribbon for each ornament
Tissue paper, for storing


Prepare Dough

Step 1

In a medium bowl, mix together 1 cup ground cinnamon and 1/4 cup applesauce using a rubber spatula.


Step 2

Stir in 1/2 cup craft glue. Stir the dough until consistency is smooth and dry. Let stand 1 hour. Applesauce gives the dough pliability, glue makes it firm, and cinnamon imparts a lovely fragrance and a gingerbread color.


Step 3

Turn out one-quarter of dough onto a cool, flat surface; flatten with your hands.


Step 4

Flatten with a rolling pin to 1/4 inch thick. If dough becomes too dry, spritz with water. If it sticks to rolling pin or work surface, sprinkle with additional cinnamon.


Cut out Shapes

Step 5

Photocopy bird templates onto card stock (these are enlarged roughly 150 percent); cut them out, punching holes where indicated. Lay a template over dough; cut out shape with a utility knife (or use bird-shaped cookie cutters). Repeat with each of three remaining quarters of dough.


Dry Ornaments

Step 6

With a straw, poke a hole in dough as indicated on template (for hanging). Air-dry ornaments on a wire rack lined with paper towels for 24 hours, turning them over every 6 hours or so to keep them flat. Alternatively, preheat oven to 200 degrees. Transfer ornaments to a baking sheet; bake, flipping once, until dry, about 2 hours. Once the dough has dried completely, adorn the birds with markings inspired by nature or your imagination. As you decorate, proceed from the finest embellishment to the coarsest, adding glitter, then beads in order of size.


Decorate Ornaments

Step 7

Using a bottle with an applicator tip, spread craft glue over the area you wish to decorate.


Step 8

While glue is still wet, sprinkle with glitter or beads, holding ornament over a bowl as you work; tap off excess.


Step 9

Wait for the first area to dry completely (at least 30 minutes) before repeating steps 7 and 8 on another section. Thread a length of ribbon through ornament's hole, trim the ends to prevent fraying, and knot. Once you take the ornaments off the tree, store them, wrapped individually in tissue paper, in a cool, dry place.


Shimmering Stacked Tree
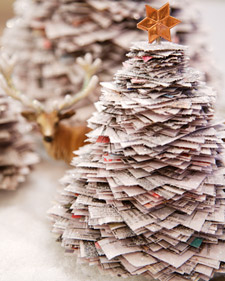
This shimmering stacked tree will add a festive -- and eco-friendly -- touch to your home this holiday season. These magnificent trees can also be stacked using any leftover aluminum foil, felt, or crepe paper.

Tools and Materials
4 ounces Sculpey clay
10-inch, 6mm thick knitting needle
Felt
Craft glue
Clear glass glitter
Receipt spike (optional)
2 pieces 6-by-6-inch card stock
Newspaper
Utility knife
Bone folder
Adhesive spray
Hot-glue gun and glue
2 paper Dresden stars
Stacked Tree How-To
1. Roll and flatten 4 ounces sculpting clay to form dome shape. Poke knitting needle horizontally through flat area of clay dome. Remove knitting needle.

2. Bake clay in oven at 275 degrees for 15 to 20 minutes. Reinsert needle into baked clay. Glue felt on bottom of base for surface protection.

3. Apply glue, then glitter, to the base. A receipt spike can be used to create a smaller tree instead of building a base using the above instructions.

4. To form tree, place 2 pieces of 6-by-6-inch card stock onto spike for stability.

5. Cut newspaper into 50 sheets of each size:
-6 by 6 inches
-5 1/2 by 5 1/2 inches
-5 by 5 inches
-4 1/2 by 4 1/2 inches
-4 by 4 inches
-3 1/2 by 3 1/2 inches
-3 by 3 inches
-2 1/2 by 2 1/2 inches
-2 by 2 inches
-1 1/2 by 1/2 inch

6. Cut 25 1-inch sheets of newspaper.

7. Begin poking pieces of newspaper onto spike in descending order, folding and unfolding each piece of paper using a bone folder.

8. Spray tree with adhesive and immediately sprinkle with diamond dust. Set aside and let dry for 10 minutes.

9. Using a hot-glue gun, adhere 2 paper Dresden stars back-to-back to top of tree.

Pinecone Hurricane Vase
Flowers and paper leaves accessorize hurricanes. After making the blossom, affix to decorative ribbon and wrap around hurricane vases.


Blossom How-To
Fill a small bowl with scales. For the work surface, you'll need a cardboard box (at least 4 inches square) with a hinged lid. Snip 4 inches of floral wire; form a small hook on one end. From card stock, cut a disk a bit larger than the desired size of the bloom's center. Secure disk to box top by poking wire through both, letting hook rest in the center so the wire won't fall through. Using tacky glue, affix scales in a flower shape to disk; the hook will become covered with glue. For a fuller blossom, add another layer inside the first, using smaller scales, adding up to five layers for larger blooms. Use tacky glue to attach one or more cloves or tiny plant parts in the center; let dry, and remove bloom from box.


Magnolia Garland
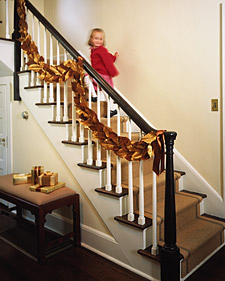
Tools and Materials

Medium-weight cardboard stock
Approximately 40 dried magnolia leaves for each section of the garland
22-gauge floral wire
Small paintbrush
Water-based glue
Gold mica
Gilding brush
Satin ribbon

Magnolia Garland How-To
1. To create the cardboard base for the leaves, photocopy the template below, increasing the size by 200 percent. Cut out each piece along dotted line and enlarge by 200 percent; repeat.

2. For each garland section, trace the shapes on cardboard stock. Cut out pieces, and punch a small hole at either end with a nail. Link pieces with double rings of floral wire to form the curved shape.

3. With brush, apply glue to top of each leaf, then dust on gold mica with the gilding brush. (Always wear a dust mask when working with mica powder.) Shake off excess and let dry completely.

4. Affix leaves to cardboard with hot glue in an overlapping pattern, alternating one mica side up, one unpainted side up. Attach to staircase using satin ribbon tied in a simple knot.


Beaded Ornaments: Letters and Stars


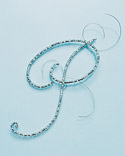
A large, sparkling monogram is a great way to personalize a present. Tied here with ribbons, the letters are easily transformed into ornaments.

Tools and Materials
Letters template (omit leaves and berries in letters if desired)
20-gauge wire (18 inches per ornament)
Seed beads
Round-nosed pliars

Beaded Letters How-To
1. Choose a letter template or use another font. Enlarge or reduce template to desired size on a photocopier.

2. Cut 20-gauge wire to size; 18 inches is generally a good starting length. Make a loop at one end with round-nosed pliers. Transfer seed beads to wire, leaving 3 inches of wire unbeaded (to allow for sharp turns in the shape), and loop the wire at the other end.

3. Following template, shape the beaded wire. Cut off excess wire at one end, leaving about 1/2 to 3/4 inch exposed wire, and loop it with pliers. For two-piece letters, attach pieces with 30-gauge wire, as shown. Shape 20-gauge wire into a hook.
Beaded Star Ornaments
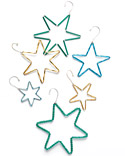
A Christmas tree covered with a few dozen beaded stars will sparkle like the night sky. Vary the size, color, and shape of the beads -- as well as the sizes of the stars themselves -- to add visual interest.

Tools and Materials
Star template
20-gauge wire (18 inches per ornament)
Seed beads
Round-nosed pliars

Beaded Star Ornaments How-To
1. Choose any star template of your liking. Enlarge or reduce template to desired size on a photocopier.

2. Cut 20-gauge wire to size; 18 inches is generally a good starting length. Make a loop at one end with round-nosed pliers. Transfer seed beads to wire, leaving 3 inches of wire unbeaded (to allow for sharp turns in the shape), and loop the wire at the other end.

3. Following template, shape the beaded wire. Cut off excess wire at one end, leaving about 1/2 to 3/4 inch exposed wire, and loop it with pliers. Shape 20-gauge wire into a hook.

Mini Stockings

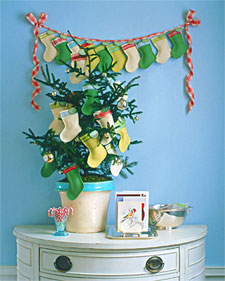
These stockings are just large enough to hold a small gift or sweet for each of the 24 days of Advent. If your tree is too small to hold 24 stockings, hang the rest from a ribbon swag.

Use a computer to print numbers, then cut them out and glue them to metal-rimmed tags; or label the tags by hand. Use felt in various colors, and add ribbons in complementary hues.

If you like, hang a swag of stockings without tags across the mantel, tie them onto gifts, or hang them from the tree.


Tools and Materials
Felt
Ribbon
Marking pencil or tailor's chalk
Sewing scissors
Pinking shears
Sewing machine
Straight pins
Awl
Metal-rimmed tags
Mini Stockings How-To
1. For each stocking, trace the template onto felt twice with a pencil or tailor's chalk, and cut out. Pin the two pieces of felt together at the toe, heel, and instep.

2. Cut a piece of ribbon just longer than the width of the stocking's opening; position it about 1/4 inch from the top, and pin in place. Sewing 1/2 inch in from the edge, machine-stitch the front, back, and ribbon together, leaving the stocking's top open.

3. Trim around the seam with pinking shears.To hang the stocking, use an awl to punch a hole through both pieces of felt in the upper right corner; thread silver twine or a narrow ribbon through the holes, and tie on a metal-rimmed tag.


Glittered Hurricane Lantern

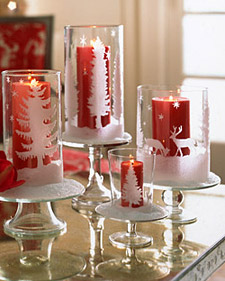
Glittered snow scenes sparkle
on these easy-to-make lanterns
as a flame dances within.

Tools and Materials
Glass hurricane lantern
Transparent tape
Glue pen
Fine clear glass glitter
Cake stand
Tall candle

Lantern How-To
Photocopy Template enlarging to fit into hurricane.

1. Roll up the template and slide it inside the hurricane, with the design facing outward. Tape at top to secure. Using tip of glue pen, outline one section of the design, and fill it in.

2. Sprinkle with glitter. Let glue dry; shake off excess glitter. Glue and glitter the next section of the design. Continue all the way around. Remove template. Place hurricane on stand, and place candle inside.

Paper Evergreen


Step 1

For large Christmas trees, use an adjustable circle cutter to make 2-, 3-, 4-, 5-, and 6-inch-diameter circles from green card stock (for small trees, omit the 6-inch circle).

Step 2

Fold each circle in half 4 times with a bone folder (top). While circles are folded, snip off the tip of each piece, forming a very small hole in center.

Step 3

Place smallest circle on the pointed end of a wooden skewer (we used 12-inch skewers), letting the tip poke through the hole in circle. With a hot-glue gun, dab underside of circle, where paper and skewer meet. Hold for 10 seconds to secure.


Step 4

Working 1 at a time from smallest circle to largest, slide remaining circles onto skewer; secure with glue.

Step 5

Insert bottom of skewer into a spool; remove, and cut skewer to desired height (we cut ours to 6, 9, and 10 inches), keeping in mind that only spool should be visible beneath standing tree. Return skewer to spool; secure with glue. Add a dot of glue to top of skewer, and attach a gold bead.


Wednesday, December 3, 2008

My poor blog! It's been a while since I last posted. My family and I went to San Francisco Bay Area for Thanksgiving. We had such a wonderful time. It's always nice to see family and to witness my boys make memories with them, especially with their grandmothers.


I realize this is late but I wanted to make sure that I do write down what I'm thankful for.

What I'm thankful for:

1. My relationship with Jesus--I am so thankful to know that no matter what happens around me, I can always rely on my relationship with Jesus! He gets me through the toughest of the toughest times. He constantly reminds me, "For I know the plans I have for you, " declares the Lord, "plans to prosper you and not to harm you, plans to give you hope and a future."

2. My husband--Am I thankful to God for him! When I was single, I loved reading this verse, "But you, O Lord, are a compassionate and gracious God, slow to anger, abounding in love and faithfulness." I prayed that God would bless me with a husband who is:
--compassionate
--gracious
--slow to anger (Leo is the most patient man I know!)
--abounding in love
--faithful
What a gracious God I serve for he delivered on his promise. I married God's best for me!

3. My healthy children--I am so thankful for my boys. Every time I look at them, I am reminded of God's unfailing love for me! Who am I that you are mindful of me? What a privilege it is to be entrusted my two boys. I pray everyday that I am raising God-fearing boys who will love and seek Jesus with all their hearts, mind and might.

4. For my family's health--It's amazing how as I get older, wealth material things get lower and lower in importance on my list. This year has been an extra tough one. I'm truly thankful that God spared me the agony and gave me a clean bill of health! One day, I will write a post on what I went through and how God got me through it.

5. My spiritual family--Living in Los Angeles is tough! Everyday, you face some kind of a spiritual attack. That's just how this city is. But am I thankful for our spiritual family! In this very dark city, there are people who live lives on fire for God. I'm so thankful for our Pastor and his wife, for being such examples to my family and others. You look at their children and you truly see fruit in their lives.

There's so much more that I'm thankful for but these are the main ones. God has been so good!

Enter his gates with thanksgiving
and his courts with praise;
give thanks to him and praise his name.
For the Lord is good and his love endures forever;
his faithfulness continues through all generations.


Psalm 100:4-5