Make sure you head on to Melissa's blog "The Inspired Room" to check out her Fall Nesting Week. There's so many women linking with their amazing ideas. How awesome and creative are these women!
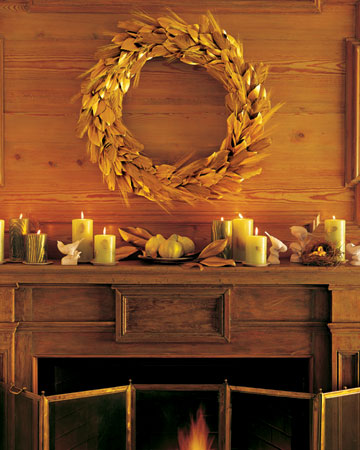 Golden Harvest Wreath How-To
This 22-inch wreath form was decorated with about 90 magnolia leaves, 150 wheat stems, and 25 feathers. If you can't find magnolia leaves, use any other sturdy, broad leaf. This wreath can last for several years: After the holidays, place it, front side up, in a flat box cushioned with tissue paper. Keep it in a cool, dry place. If a few of the magnolia leaves look tired when you unpack it, replace them with freshly painted ones.
Tools and Materials
Floral spray in brilliant gold White feathers
Magnolia leaves
24-gauge gold wire
Gardening shears
Wheat stems
22-inch wire wreath form
Hot-glue gun
1. On a clean, dry surface protected by paper in a well-ventilated area, spray the feathers and the top sides of the magnolia leaves gold. Let dry.
2. Bundle 3 leaves with a small piece of wire; snip end. Bundle 5 wheat stems with wire, and snip end. Repeat with the remaining leaves and stems. Wrap the bundles to the wreath form with a single piece of wire, alternating and overlapping bundles of leaves and stems. Keep them tight and close together.
3. Once the wreath form is covered, insert the feathers at equal intervals. Glue in place.

Gourd House Number How to
For a functional entryway decoration, emblazon a gourd with your house number. Print the number in any font and size. Cut out, and tape to a large dried gourd (available from florists). Fit a wood-burning tool with a needle tip, and pierce evenly spaced holes into the gourd's skin, outlining the digits. Add other decorative touches around the number with pencil; pierce again.

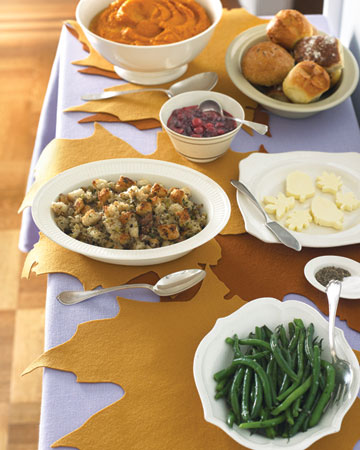
Large trivets in leafy shapes add seasonal style while protecting your dinner table from piping-hot plates.
Leaf Trivets How-To
On a photocopier, enlarge the leaf template to desired size. (For a 17 1/2-by-15 1/2-inch leaf, photocopy the template at 313 percent, and then enlarge the copy an additional 313 percent. Oversize printouts may require several sheets of paper; piece together with tape.) Cut out template. Using a disappearing-ink fabric pen, trace the template onto wool felt. Cut out with fabric shears. Repeat to make multiple trivets, and place on tabletop, layering two or more leaves in the spots where hot dishes will rest.

A molded candle can light up a room even after the flame is out. The following arrangements draw from the natural beauty of the season, whether the candles are whimsical (three-inch tom turkeys and tiny purple pinecones) or realistic (orange pumpkins, yellow gourds, and green 'Forelle' pears with blushes of red). They're ideal as a centerpiece for the holiday table or as a gift for a dear friend.
The first thing you'll need to make these candles is a mold in which to pour the molten wax. Although the candle mold was invented in France during the fifteenth century, it did not achieve great popularity until the 1800s, when the mass-production methods of the Industrial Revolution made molds affordable for the average person.
Homogeneous candle making, however, is not the goal here. A large selection of molds is available at crafts stores, or you can make your own, as we've done using birch logs and pumpkins. Even a candy mold will do the job. Just don't use plastic, which may melt.
We favor beeswax for its soft, opaque glow, which provides a visual warmth that remains after the wax has been colored. Finally, we dress up some of the candles with paint or petal dust for a realism that plain wax can't achieve.
When you spot a pumpkin with a striking silhouette, make a candle in its likeness (above, left). Grouped together, pumpkin and gourd candles, along with walnuts, hazelnuts, pecans, and bittersweet, make an eye-catching display.
Color Glossary
Colorant is sold in blocks; cut 1/4-inch square shavings with a knife or a vegetable peeler. For every pound of bleached beeswax, use the following number of shavings to create the various projects in this article.
A. Tan turkeys: unbleached beeswax; no colorant
B. Off-white turkeys: no colorant
C. Rust turkeys: 4 cherry, 3 sunshine yellow, 1 white
D. Pale-orange pumpkins and gourds: 6 white, 4 brown, 2 rust brown, 2 sunshine yellow, 1 olive
E. Orange pumpkins and gourds: 10 sunshine yellow, 5 rust brown, 2 brown
F. Yellow gourds: 6 sunshine yellow, 4 white, 2 brown, 1/2 rust brown
G. Burnt-orange gourds: 6 sunshine yellow, 4 brown, 4 rust brown, 3 cherry, 3 ruby
H. Violet pinecones: 3 violet, 2 brown, 1 ruby
I. Lavender pinecones: 3 violet, 1 true black
J. Logs: 10 brown, 3 rust brown, 3 true black
K. Pears: 2 olive, 1 turquoise, 1 sunshine yellow, 1/2 rust brown

 Table arrangement of grains celebrates the bounty of fall. In addition to wheat, which symbolizes a fruitful life, this textured display includes other dried grasses (available at crafts stores), so it can be made weeks ahead. The final flourish? A luxurious satin bow.
Centerpiece How-To
To make each centerpiece, you'll need about a hundred stalks (six bunches) of dried grass and wheat.

1. Bundle 15 or so stems together at a time (they're easiest to handle if you secure bundles with floral tape about 4 inches below grain pods).

2. Hold between thumb and forefinger at an angle. Add bundles, in a spiral as shown, until all are used.

3. Wrap with floral tape (choose a color that matches your ribbon). Trim ends with floral pruner (cut center tips shorter for a stable base). Tie a wide ribbon over tape.

Tool for the Task: Colored Floral Tape
This handy tape, which becomes sticky only when you stretch it, and then adheres only to itself, is now widely available in a variety of shades. That means it blends beautifully into boutonnieres, bouquets, and centerpieces such as this one.
 When cold weather arrives, gourds, winter squash, Indian corn, and small pumpkins can fill the planters that once overflowed with flowering annuals; tuck some colorful leaves into any gaps. There's no better way to capture the spirit of the fall harvest season.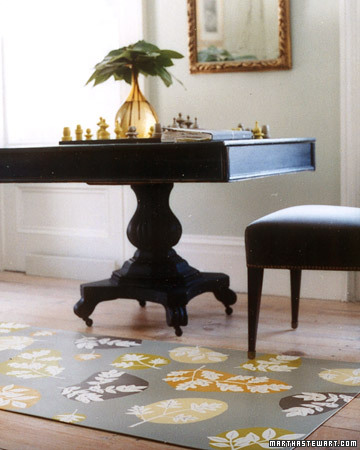
Fall Leaf Floor Canvas How to
Creating art underfoot is an easy step-by-step process, and no fancy supplies or skills are required. Just prime a piece of canvas, paint a design, and seal it with varnish. Our patterns are as simple to reproduce as scattering leaves from your backyard across a surface, marking stripes with tape rather than a ruler, tracing bowls for circles, and painting streaky brushstrokes on a grid. Use household tools and our stencils or create your own. Don't worry about perfect lines; these rugs are handcrafted and should look it. So go ahead -- make the floor your canvas.
Easy-Care Accents
These practical floorcloths are durable and inexpensive to make. They clean up with a damp mop and mild detergent. No wonder canvas rugs have been popular since colonial times. After the introduction of linoleum, they fell out of favor early in the last century. The craft was revived in the 1950s, when period rugs were made for historic homes. Modern materials have streamlined the technique; with today's quick-drying, water-based products, you can paint a rug this weekend and have it for years.
Painting Tips
Use liquid acrylics (if you use heavy-body acrylics, which come in tubes, thin with water to the consistency of cream) and flat brushes in a variety of sizes. To match hues in your room's decor, you can mix tints: Combine titanium white with other colors for lighter shades, or add a dab of burnt umber to give an earthy tint. If you would like a warm, neutral background, paint the canvas with a wash of titanium buff (1 tablespoon paint mixed with 4 cups water). When customizing a shade of paint, you won't be able to reproduce it exactly once you've used it up, so don't skimp on amounts; to paint a solid color on a door-size canvas, you'll need about 2 cups. Use airtight jars to store the colors you've blended.


Prepping the Canvas
Tools and Materials
drop cloth
hollow-core door, or 1/2-inch plywood cut to size
number 10 canvas duck, cut to dimensions of door or board plus a 6-inch margin
staple gun
paper cups
paint roller on broomstick
roller tray and liner white acrylic gesso
medium-grit sandpaper
It's easiest to stretch the canvas over a hollow-core door, which is lightweight and just the right size for a rug. For other dimensions, you can also use plywood cut to size. We primed both sides for added durability.
1. Working on a large table or on a drop cloth on the floor, center door or board on canvas. Smooth the fabric around to the back, stapling it at each side's midpoint. Continue stapling from the center points outward, about every 3 inches. Fold one side neatly under the other; staple at each corner (far left).
2. Flip the door, and support it on upside-down paper cups. Using a roller, prime the surface and edges with gesso (if using plywood, prime 1 inch border of underside, too). Let dry. Lightly sand.
3. Remove staples, and flip the canvas. Reposition canvas on door, matching up fold lines; staple again.
4. Prime surface and edges with gesso. Let dry; sand surface and edges. Add another coat. Let dry; sand.

Making a Leaf Rug
Tools and Materials
liquid acrylic paints
paintbrushs in a variety of sizes
leaves or leaf stencil template
scissors
pencil
self-adhesive shelf liner
tracing paper
1. Paint canvas with a wash of titanium buff acrylic (1 tablespoon paint to 4 cups water). Let dry.
2. Gather leaves, and photocopy groupings of them, life-size or enlarged (or download our templates). Cut out shapes, and trace them onto self-adhesive shelf liner (to help them stay put while you work). Cut out stencils.
3. To create ring templates, place tracing paper over leaf patterns and draw abstract ovals around them. Cut out shapes, and trace them onto shelf liner. Cut out stencils; cut away inner circle of each to form a ring.
4. Scatter leaf stencils over canvas. Peel a corner of the backing from a leaf, and press down to adhere; then slowly peel and flatten remainder.
5. Adhere ring stencils over leaves.
6. Paint background canvas except inside rings. Let dry.
7. Slowly peel off ring stencils, but not those of leaves. Paint in rings. Let dry.
8. Remove leaf stencils; paint lines for leaf veins in background color. Let dry.


Finishing Your Rug
Tools and Materials
polyacrylic varnish
wide paintbrush
drop cloth
scissors
yardstick
pencil
1 roll double-sided carpet tape
bone folder or butter knife
1. Apply two coats of varnish to painted surface, according to label instructions. Let final coat dry overnight. Turn the door over, and lay it on a drop cloth on the floor; then unstaple the canvas.
2. The door's edges create two fold lines that delineate the hem. Trim excess canvas just outside outer fold line (if plywood was used, mark and trim to 1 inch outside the fold line).
3. To miter the corners, fold in the hem on both sides of a corner so their edges meet; mark that point on each.
4. Lay the fabric flat again, and draw a line between the two points; it should intersect the corner of the inner fold line. Trim just outside the line that you've marked. Repeat with remaining corners.
5. Affix carpet tape to underside of hem on each side of canvas; press hem flat, and burnish with bone folder or the handle of a butter knife. Carefully turn over rug without bending it; let dry 4 days, or according to varnish directions, before using it. Lay it on the floor over a nonslip pad of the same size.
We offer this file in a portable document format, or PDF, in order to make the details clear and printable. To view and print the file, you need a program called Adobe Acrobat Reader, which most browsers already include. If you have trouble downloading the file, or if you'd like to upgrade to Acrobat Reader 8.0, you can obtain the software for free from Adobe's website.


.jpeg)











13 comments:
Wow, girl, you have the motherlode of inspiration here! Thanks for all the hard work and detail you put into this post! so inspiring!
THANK YOU for being a part of Fall Inspiration week! I'm so glad you are sharing and being a part of the fun!
Blessings & hugs,
Melissa
Oh how I love the gourd with the house numbers on it & that beautiful gold magnolia leaf wreath! Hmmm, my mom has a magnolia tree....
Thanks so much for sharing!
Big TX Hugs,
Stephanie
Angelic Accents
Wow, what a post. Loved all the information. That rug I would love to try and the gourd with the house numbers on it. What a great job and great idea. thanks for taking the time to do all this!
Blessings,
Debbie
Hi there! I'm so glad you came by to visit today! These are all such great ideas! I love magnolia leaves and have always wanted a magnolia leaf wreath. I saw a gold one at a craft sale last Christmas but someone else had already bought it. I'm just going to have to find someone with a tree so I can make my own!
My heart is PALPITATING at all the inspiration. WOW! It makes me want to call in sick tomorrow so I can stay home and get my crafty on!
beautiful ideas...thanks!!
I LOVE that wreath and the way the mantel is decorated. And the number gourd. And the floor canvas. All of it! How fun and inspiring!
Kari
Wow! I'm impressed. Beautiful post and directions too?! Amazing :)
Happy Fall,
rue
Oh, I am so ready for fall! Once school starts I am ready for cooler weather, leaves changing color and autumn decorations. But we are still a ways away from cooler weather in Alabama. Those ideas are great, though, and I love the gourd. that could be done in so many ways with great effect.
Hi, I'm new to your blog, and I love this thread. Thank you so much for all of these clever ideas! Wow!
I found some placemats last year or year before at K-Mart that are ultra suede fall leaves, and I love them. I am so happy to find this leaf template because I could add to the ones I have with this and do something down the center of table like they did in that picture. I loved the first wreath, too. Great look! And the rug and the gourds and the... all good!
Sheila (who loves Jesus, too!) :-D
Thanks for all the great ideas!
You are so crafty!
I love fall!
What fabulous ideas you have in your post...very inspirational! I especially love the house number gourd. Lovely blog...Kathy
Great ideas! I did the house number one last year and loved the look.
Post a Comment